| Setup | |
| What is Radiant? | |
| Common folders and associated files | |
| Configuring Radiant | |
| The Radiant display | |
| Back to main menu |
It is best to have a clean install of ET separate to the one you play on, for making and testing maps.
However I haven't done this (I was nervous that installing ET twice might make a mess in the registry) so I use my usual ET environment. There is a penalty for using the same environment: before running Radiant I have to drag all of the non-core PK3 files out of etmain and into a temp folder. When I'm finished I drag them all back again. This is because Radiant will otherwise include elements from the other PK3s into the map I am creating, which will cause all sorts of display problems when distributed.
If you don't want a second install and intend to use your existing ET environment then for now you won't have to remove any PK3 files - this basic lesson will be unaffected by the presence of additional PK3 files. But if you continue with mapping as a hobby you will need to do what I do. See next for the PK3s you can leave in the \etmain folder.
The PK3s I leave in \etmain are:
- common.pk3
- etmapcycle.pk3
- mp_bin.pk3
- pak0.pk3
- pak1.pk3
- pak2.pk3
- All the 1KB campaign PK3 files
Everything else should be moved into a temporary folder while you do your mapping/testing - drag them back before playing ET online again. At the later stages of mapping, ie once you don't start using any further new textures, you will be able to leave the other PK3s in place while you map.
- levelshots
- maps
- scripts
- sound
- textures
Create these folders within your new sound folder:
- maps
- scripts
Radiant also provides a way of compiling your map into the format required by ET to interpret and play it. The compiler will produce a file called "<yourmap>.bsp", also in the maps folder.
Maps are stored in the etmain\maps folder and have a .map suffix.
The <yourmap>.map file is compiled to produce a <yourmap>.bsp file, also placed in the \maps folder. Most of the other files that make up your map package contain text and can be created and edited using Wordpad.
|
|
The commonly used folders and files within etmain are:
| levelshots | command map (<yourmap>_cc.tga) and map loading photo (<yourmap>.tga) |
| maps | map object (<yourmap>.bsp) |
| the script that powers your map (<yourmap>.script) | |
| objective descriptions for the limbo views (<yourmap>.objdata) | |
| scripts | map description shown while the map loads (<yourmap>.arena) |
| special information regarding the textures in your map (<yourmap>.shader and <yourmap>_levelshots.shader) | |
| sound/maps | ambient sound effect placement (<yourmap>.sps) |
| sound/scripts | speech, like "They've stolen the tank!" (<yourmap>.sounds) |
| sound/<yourmap> | If you create bespoke sounds (WAV files of a particular format) |
| textures/<yourmap> | If you create bespoke textures (TGA and JPG files of particular dimensions) |
Press P to bring up program preferences.
Select the following tabs and ensure the suggested settings are applied:
| Game Settings | Select ET as the default game |
| Tick Auto load selected game | |
| 2D display/rendering | Tick first 2 boxes |
| 3D view | Tick boxes 1 4 and 5, and 3 if you want inverted mouse |
| Editing | Tick first 3 boxes |
| Undo levels = 30 | |
| Startup/autosave | Tick boxes 2 and 4, set autosave every 5 |
| BSP monitoring | Tick boxes 1, 2 and 5 |
Click OK
Adjust your Radiant windows so that they have roughly the same dimensions as shown below.
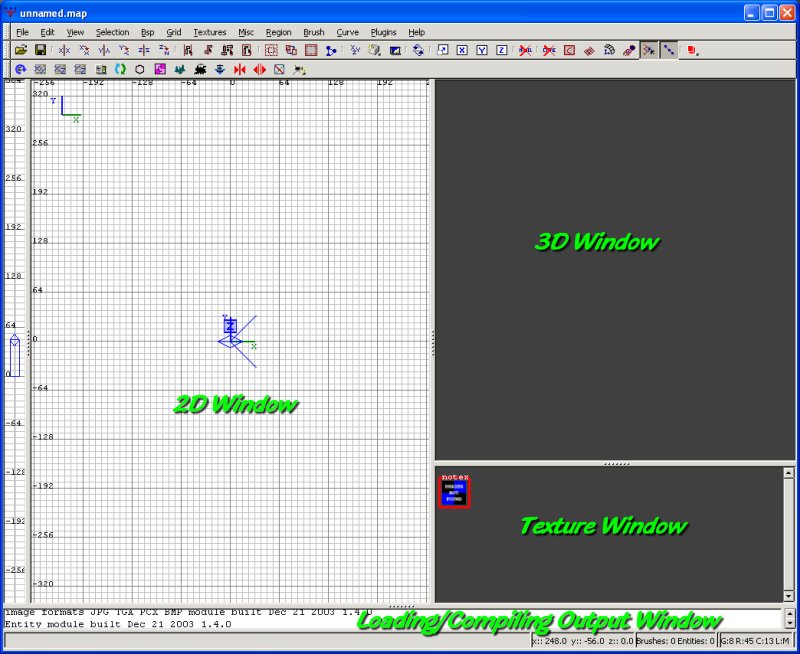
Maximize the radiant window if you haven't, you're going to need all the screen space you can get.
| The 2D window | Overhead and two side views available, view from X Y or Z dimension. Use ctrl+tab to cycle thru the views. Use mouse wheel to zoom in/out. |
| The 3D window | Free movement around your creation in 3D. Right click in 3D window to enable free movement. Move mouse to look around and arrow keys to move. Right click to quit free movement. |
| Texture window | The textures used so far in your creation, plus any others you have selected ready to choose from. Click on a texture to see its name shown bottom right. |
| Output window | The log of what loads when you open a map or load up textures. Also the log of your compiler activity. |
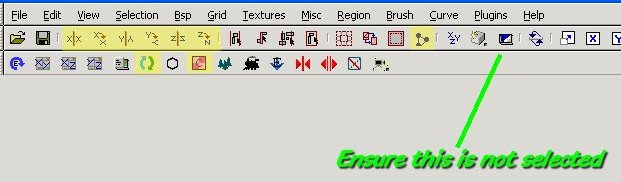
| Toolbar | This looks intimidating, but happily you only actually use a very few of the buttons in practice. In the picture below I have coloured yellow the buttons I use - I don't use the others at all. Make sure the cubic clipping (indicated in the pic) is turned off, or you won't see all of your map in the 3D window. |